EVERY ORDER SUPPORTS FAMILIES IN NEED



porcelain adjustment kit: Easy crown cutting & Endo access
Related products
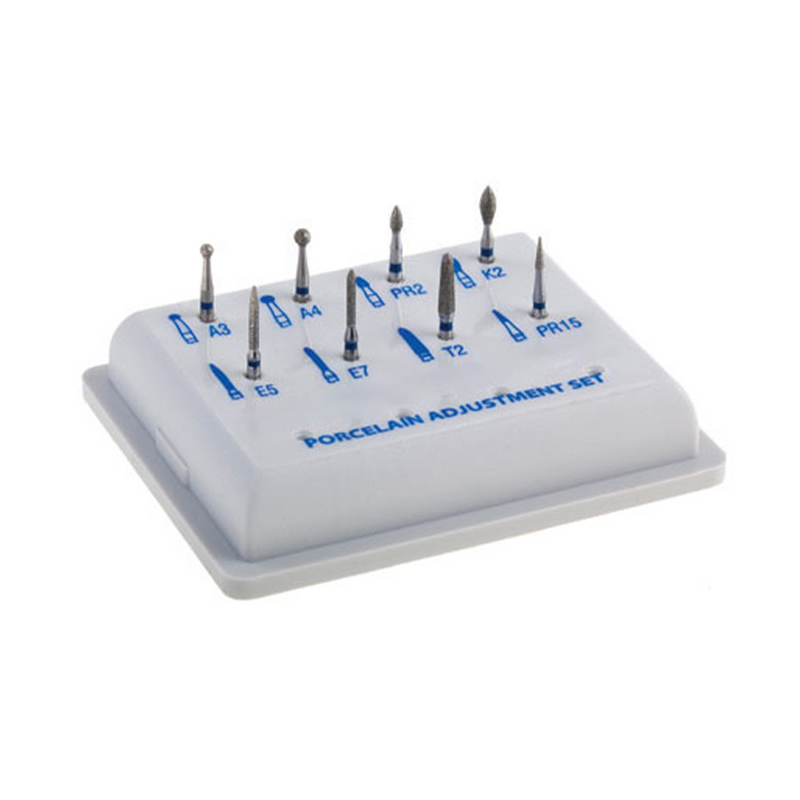
A porcelain adjustment kit built for crown cutting and endo access
The Eagle porcelain adjustment kit holds eight burs in one autoclavable block for chairside work on porcelain, PFM and ceramic restorations. Two long-neck round burs open endo access through a porcelain or ceramic crown, two long cylinders cut and section crowns, and four contouring shapes handle margins, occlusal and lingual adjustments. It is a focused cutting and access kit: there are no polishers in this set, so every slot is a working bur.
What's in the kit

| Bur | Shape | Main use |
|---|---|---|
| A3PF | Small round, long neck | Endo access, marginal ridge adjustment |
| A4PF | Larger round, long neck | Endo access, marginal ridge adjustment |
| E5PF | Long cylinder | Crown cutting, margin adjustment |
| E7PF | Long cylinder | Crown cutting, margin adjustment |
| PR15PF | Fine pointed taper | Margin detailing |
| PR2PF | Short bullet | Occlusal surface adjustment |
| K2PF | Football | Lingual surface adjustment |
| T2PF | Long taper | Trimming excess material |
The burs sit in a labeled block that can be autoclaved at up to 135°C, so each shape goes back in the same slot after sterilization.
How to section a porcelain or PFM crown
- Plan the cut. Section from the buccal margin, over the occlusal surface, and toward the lingual. This gives a clean line for the crown spreader.
- Score the porcelain. Use the E5PF or E7PF cylinder with light, sweeping strokes to open a groove through the porcelain layer along the planned line.
- Deepen the groove. Keep the bur moving and let it cut. On an all-ceramic crown, continue until you reach the cement line. On a PFM, stop once the metal coping is exposed and switch to a carbide metal cutter for the coping.
- Split and lift. Insert a crown spreader into the groove, twist gently to split the crown, and remove the pieces.
For metal-heavy or monolithic zirconia removals, our Crown Removal Kit adds dedicated cutters for those materials.
How to gain endo access through a porcelain or ceramic crown
- Mark the outline. Locate the access point on the occlusal or lingual surface, based on the radiograph and the tooth's anatomy.
- Enter with the A3PF. Start with the small round bur at a slight angle, then bring it upright to create a small entry point through the porcelain without loading the edges.
- Widen with the A4PF. Switch to the larger round bur to open the access cavity to its final outline. The long neck keeps your view of the head clear.
- Continue below the crown. Once through the restoration, change to your usual endo burs for the core and pulp chamber.
- Check the edges. Look at the access margins under magnification. A smooth outline is less likely to start a crack.
Speed, water and pressure tips
- Run the burs in a high-speed handpiece with full water spray at all times. Porcelain and ceramics are heat sensitive, and dry cutting raises the risk of cracks.
- Use light, intermittent pressure. Let the bur do the cutting instead of pushing it.
- Keep the bur moving. Holding one spot builds heat and can chip the porcelain edge.
- Cut from porcelain toward metal, not the other way, to reduce the chance of the porcelain lifting off the coping.
Porcelain kit or zirconia kit?
Choose this porcelain adjustment kit for feldspathic porcelain, PFM crowns and bridges, and glass ceramics such as lithium disilicate, where you need crown cutting, endo access and everyday adjustments. If most of your restorations are monolithic or high-strength zirconia, and you also want polishers in the same set, the zirconia adjustment kit is the better fit.
Care and sterilization
- Remove debris right after use with a bur brush, then rinse and dry.
- Clean with an ultrasonic cleaner and a bur-safe solution if needed.
- Autoclave the burs in their block at up to 135°C.
- Replace a bur when it cuts noticeably slower, vibrates or needs more pressure. A worn bur produces more heat.
See the burs in action