EVERY ORDER SUPPORTS FAMILIES IN NEED



Gingival Curettage Burs
877K-014
014
6.5
19
Related products
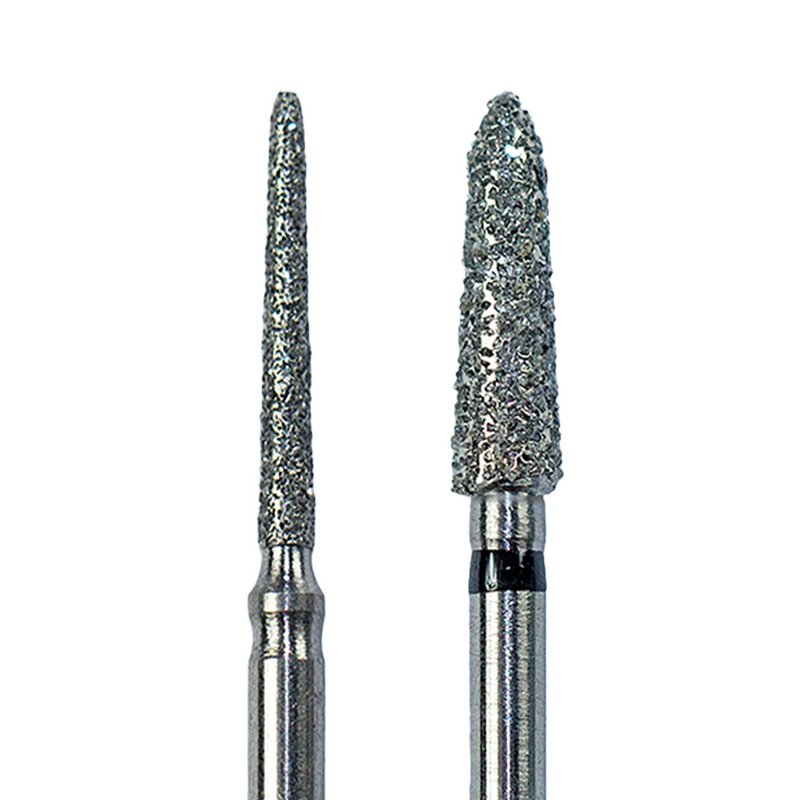
Gingival Curettage Burs - FG Torpedo Diamond Burs
Eagle gingival curettage burs are FG diamond burs with a torpedo (round-nosed chamfer) head, made for rotary gingival curettage during crown preparation. The range includes 11 shapes - S1 to S5 and T1 to T6 - in tapered, cylindrical and long torpedo profiles, with grits from super fine to super coarse.
Rotary curettage, also called gingitage, is a troughing technique for subgingival margins: as the torpedo diamond extends the finish line into the sulcus and forms a chamfer, it also removes the sulcular epithelium. The result is an exposed, clearly defined margin for the impression and the final restoration.
Clinical Uses
- Rotary gingival curettage (gingitage) - extending the finish line subgingivally while removing the sulcular lining
- Chamfer margins - forming and refining chamfer finish lines in crown and bridge preparation
- Subgingival margin preparation - Class II and Class V preparations that extend below the gingival margin
- Impression troughing - creating a clean, visible margin for conventional or digital impressions
Rotary curettage is typically indicated for healthy gingiva: no bleeding on probing, a shallow sulcus and adequate keratinized tissue. Use generous water spray throughout.
Rotary Gingival Curettage: Step by Step
A general outline of the technique - follow your own clinical protocol and training.
- Assess the tissue: confirm healthy gingiva and sulcus depth before planning a subgingival margin.
- Prepare to the gingival margin: complete axial reduction and place the chamfer at the gingival level first.
- Choose the torpedo: match the head diameter to the chamfer width you planned (S codes smaller, T codes larger).
- Extend into the sulcus: with water spray and light pressure, carry the torpedo tip slightly below the gingival margin, following the tooth contour so the chamfer and the curettage happen in one pass.
- Refine: smooth the finish line with a fine or super fine torpedo of the same shape.
- Control bleeding and record: manage any bleeding per your protocol before taking the impression or scan.
Grit Guide
- Black band - Super Coarse: rapid reduction
- Green band - Coarse: chamfer preparation and rotary curettage
- No band - Medium: general preparation and margin extension
- Red band - Fine: refining the chamfer and finish line
- Yellow band - Super Fine: final smoothing of the margin
Not every shape comes in every grit - choose the code first, and the selector shows the grits available for it.
Shapes and Codes
Each code is listed with its equivalent ISO shape and size reference (shape number - head diameter in tenths of a millimeter). S codes have smaller heads (1.4-1.6 mm); T codes have larger heads (1.6-2.2 mm).
- Tapered torpedo (878K): S2 (014), S5 (016), T3 (018), T1 (020), T2 (022)
- Cylindrical torpedo (877K): S4 (014), T5 (016), T4 (018)
- Long torpedo (879K): S3 (014), S1 (016), T6 (018)
See the size chart in the product images for the head shape of each code.
Choosing a Torpedo Shape
- Tapered torpedo: the usual choice for full-coverage crown preps, matching a tapered axial wall
- Cylindrical torpedo: parallel walls and a uniform chamfer depth
- Long torpedo: long clinical crowns and extended axial walls
Chamfer Bur vs Flame Bur
A torpedo chamfer bur has a rounded tip, so it leaves a defined chamfer that is easy to read on an impression or scan. A flame bur tapers to a point and leaves a feather-edge finish line. Choose the chamfer bur when the design calls for a clear margin with room for the restorative material.
How to Get the Most From Each Bur
- Run the FG bur in a high-speed handpiece at the speed recommended by the handpiece and bur manufacturer.
- Always use water spray; dry cutting overheats the tooth and the tissue.
- Use light pressure and keep the bur moving.
- Replace a bur when it stops cutting efficiently - forcing a dull bur raises heat and tissue trauma.
Cleaning and Sterilization
These burs are autoclavable and reusable. Before each use, pre-soak in a bur-compatible disinfectant, brush or clean ultrasonically in a bur holder, rinse, dry, pouch and autoclave following your clinic's reprocessing protocol. Inspect each bur and discard it if the diamond coating is worn or the shank is bent.
Specifications
- Shank: FG (friction grip), 1.6 mm, for high-speed handpieces
- Head: diamond-coated torpedo
- Codes: S1, S2, S3, S4, S5, T1, T2, T3, T4, T5, T6
- Grits: Super Fine, Fine, Medium, Coarse, Super Coarse (availability varies by code)
- Pack size: 5 burs of the selected code and grit per pack
- Sterilization: autoclavable
- Made in: Israel
Order Gingival Curettage Burs Online
Choose your code and grit above. Every order ships express worldwide with tracking. For other preparation shapes, browse all diamond burs, or read our dental burs guide to decode grits and ISO numbers.
Ready to Subscribe?